

Wednesday, February 20, 2013

Gluten Free Hearty Chicken Pot Pie
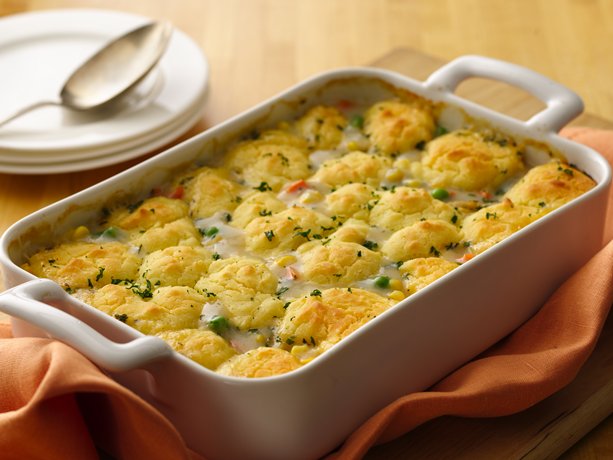
Dinner ready in 45 minutes! Enjoy this scrumptious chicken pot pie packed with veggies and herbs – a hearty casserole!


- PREP TIME15 Min
- TOTAL TIME45 Min
- SERVINGS6
- 2
- tablespoons butter or margarine
- 1
- medium onion, chopped
- 1
- bag (12 oz) Green Giant® Valley Fresh Steamers™ frozen mixed vegetables
- 1 1/2
- cups cut-up cooked chicken
- 1 3/4
- cups Progresso® chicken broth
- 1
- teaspoon seasoned salt
- 1/2
- teaspoon dried thyme
- 3/4
- cup milk
- 3
- tablespoons cornstarch
Topping
- 3/4
- cup Bisquick® Gluten Free mix
- 1/2
- cup milk
- 1
- egg
- 2
- tablespoons melted butter or margarine
- 1
- tablespoon chopped fresh parsley
- 1Heat oven to 350ºF. In 3-quart saucepan, melt butter over medium heat. Add onion; cook, stirring frequently, until tender. Stir in vegetables, chicken, chicken broth, salt and thyme; heat to boiling. In small bowl, mix 3/4 cup milk and the cornstarch with wire whisk until smooth; stir into chicken mixture. Heat just to boiling. Pour into ungreased 2-quart casserole.
- 2In small bowl, stir all topping ingredients except parsley with fork until blended. Drop topping mixture by small spoonfuls over chicken mixture. Sprinkle with parsley.
- 3Bake 25 to 30 minutes or until toothpick inserted in center of topping comes out clean.
- Thank you to Betty Crocker for this recipe
Gluten Free NY Style Cheesecake

Gluten-Free Cherry New York Cheesecake
Image-istockphotoThis decadent gluten-free version of New York cheesecake is made with 2 pounds of cream cheese and 1 pound of sour cream! The crust is made with gluten-free graham-style crackers and the cake is topped with gluten-free canned cherry pie filling. The result of this easy recipe- a spectacular, wildly crowd-pleasing dessert.
Prep Time: 30 minutes
Cook Time: 1 hour
Total Time: 1 hour, 30 minutes
Ingredients:
- Crust Ingredients:
- 1 1/4 cups gluten-free graham cracker crumbs, about 6 ounces (I used Kinnikinnick Gluten-Free Smoreable Graham Crackers)
- 4 tablespoons melted butter
- 2 tablespoons sugar
- 1/4 teaspoon nutmeg
- Cheesecake Filling Ingredients:
- 2 pounds softened cream cheese ((4 8-ounce packages))
- 1 cup sugar
- 4 large eggs
- 1 cup sour cream
- 2 tablespoons sweet rice flour OR cornstarch
- 1 teaspoon vanilla extract
- Sour Cream Topping Ingredients:
- 1 cup sour cream
- 1/4 cup sugar
- 1 teaspoon vanilla
- Cherry Glace Ingredients:
- 1 21-ounce can cherry pie filling
- 1 tablespoon sugar
- 1/4 teaspoon vanilla
Preparation:
Preheat oven to 325°F / 163°C
9-inch springform cake pan
9-inch springform cake pan
Place gluten-free graham crackers in a plastic zip bag and finely crush with a rolling pin. Pour crumbs into a mixing bowl. Add sugar and nutmeg and stir to thoroughly blend. Add melted butter and stir to combine.
Press crumb mixture into bottom of springform pan. Don't press the crumbs on the sides of the pan. Refrigerate while preparing the cheesecake filling.
Place cream cheese and sugar in a large mixing bowl. Beat with an electric mixer on high until creamy. Add eggs, one at a time. Add sweet rice flour, sour cream and vanilla. Beat on high until smooth.
Remove crust from refrigerator. Pour cheesecake filling into spring form pan. Smooth top with a spatula and bake for 45 minutes.
While cheesecake is baking, place remaining 1 cup sour cream, 1/4 cup sugar and 1 teaspoon vanilla in a bowl and whisk until smooth and blended.
Remove cheesecake from oven and carefully spread sour cream mixture over the top of the cheesecake. Use a spatula to spread sour cream topping over the baked cheesecake with a light touch. Return cake to the oven and bake an addition 15 minutes. Turn off oven and leave cheesecake in the oven for 1 hour before removing.
Cool completely and refrigerate for at least 4 hours before serving.
While cake is cooling combine cherry pie filling, 1 tablespoon sugar and 1/4 teaspoon vanilla. Stir to blend. Spread cherries over chilled cheesecake just before serving.
Yield- 8 to 12 serving
Thank you about.com for the recipe.
Thank you about.com for the recipe.
Wednesday, January 30, 2013
My Favorite Valentine's Day Cake Recipe
Easy Flourless Chocolate Cake with Silky Chocolate Glaze Recipe
By

Gluten Free Flourless Chocolate Cake with Chocolate Glaze
Photo- 2009 © Teri Lee GrussThis easy recipe for flourless chocolate cake with silky chocolate glaze is a decadent finale to any special celebration.
If you have a 7-inch tart pan with crimped edges and a removable bottom the cake bakes up with fanciful fluted edges and is easy to remove from the pan after baking.
Prep Time: 20 minutes
Cook Time: 25 minutes
Total Time: 45 minutes
Ingredients:
- 6 1-ounce squares coarsely chopped semisweet chocolate
- 1/2 cup (1 stick) unsalted butter
- 3/4 cup sugar
- 3 large eggs
- 1/2 cup cocoa
- 1/4 teaspoon salt
- 1 teaspoon vanilla
- For Glaze:
- 2 1-ounce squares coarsely chopped semisweet chocolate squares
- 1 1/2 tablespoons unsalted butter
- 1 1/2 teaspoon milk OR light coconut milk
- 1 1/2 teaspoons Agave syrup OR honey
- 1/8 teaspoon vanilla
Preparation:
Preheat oven to 350°F
Spray a 7-inch tart pan with removable bottom with cooking spray. If you don't have a tart pan, use a 6 to 7-inch springform pan. Line the bottom of the pan with parchment paper and spray the paper.
Spray a 7-inch tart pan with removable bottom with cooking spray. If you don't have a tart pan, use a 6 to 7-inch springform pan. Line the bottom of the pan with parchment paper and spray the paper.
- Melt 6 ounces of chopped chocolate and butter in a heavy saucepan over medium low heat. Stir until chocolate and butter are melted and smooth.
- Add sugar and salt and reduce heat to low. Cook while stirring for about one minute, until sugar starts to dissolve.
- Remove pan from heat. Whisk in eggs, one at a time. The mixture will look smooth and glossy.
- Use a mesh hand sieve to sift cocoa into mixture. This prevents lumps. Whisk until the cake batter is smooth.
- Pour batter into prepared pan and bake in preheated oven for about 25 minutes. The center of the cake should be just firm to the touch, but be careful to not overbake the cake or it will be dry.
- Cool in the pan on a wire rack for 15 minutes. Invert the cake on a plate.
- To prepare the glaze, melt 2 ounces of chopped chocolate and 1 1/2 tablespoons of unsalted butter in the same saucepan you used to make the cake. When melted and smooth, remove the pan from heat. Add milk and Agave syrup OR honey and vanilla and stir until smooth and glossy. Let the glaze cool for about 3 minutes before pouring it on the cake.
- Pour all of the glaze in the middle of the cake. Use a silicone or rubber spatula to spread the glaze evenly over the cake, allowing the glaze to evenly run down the sides of the cake.
Serves
6 - Thank you to gluten free cooking For the recipe
Monday, January 28, 2013
Olive Garden
I went to Olive Garden recently for dinner and found out they have a gluten free menu. I was really surprised as I did not know this before hand. I liked the idea of them having GF pasta . The only issue was I wanted the Alfredo sauce and they told me it was not gluten free , Otherwise the choices are all red based sauces. I am hoping they can come up with some new sauces for us gluten free people :)
Monday, January 21, 2013
Gluten Free Quiche Lorraine
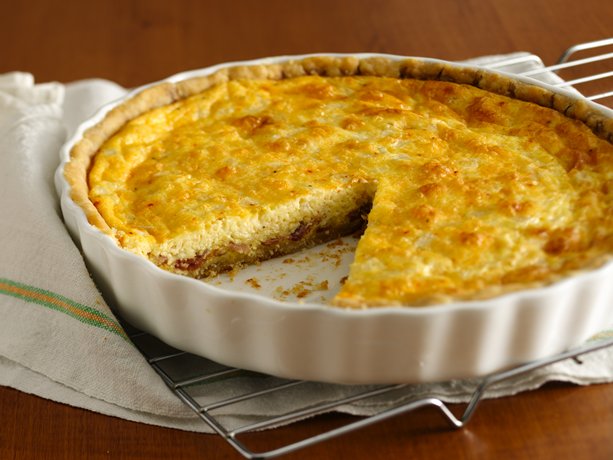
You can serve this classic French egg dish, featuring bacon and Swiss, as a main course anytime of day.
- PREP TIME25 Min
- TOTAL TIME1 Hr 30 Min
- SERVINGS6
Pastry
- 1
- cup Bisquick® Gluten Free mix
- 1/3
- cup plus 1 tablespoon shortening
- 3
- to 4 tablespoons cold water
Filling
- 8
- slices bacon, crisply cooked, crumbled (1/2 cup)
- 1
- cup shredded Swiss cheese (4 oz)
- 1/3
- cup finely chopped onion
- 4
- eggs
- 2
- cups whipping cream or half-and-half
- 1/4
- teaspoon salt
- 1/4
- teaspoon pepper
- 1/8
- teaspoon ground red pepper (cayenne)
- 1Heat oven to 425°F. In medium bowl, cut shortening into Bisquick mix, using pastry blender (or pulling 2 table knives through ingredients in opposite directions), until particles are size of small peas. Sprinkle with cold water, 1 tablespoon at a time, tossing with fork until all flour is moistened and pastry almost cleans side of bowl (1 to 2 teaspoons more water can be added if necessary).
- 2Gather pastry into a ball. In ungreased 9-inch quiche dish, press pastry evenly in bottom and up sides. Bake 12 to 14 minutes or until pastry just begins to brown and is set.
- 3Reduce oven temperature to 325°F. Sprinkle bacon, cheese and onion into crust. In medium bowl, beat eggs slightly; beat in remaining filling ingredients. Pour into crust.
- 4Bake 45 to 50 minutes or until knife inserted in center comes out clean. Cool 10 minutes before serving.
Gluten Free Pizza

yield: Makes two (10-inch pizzas); 2 to 4 servings
Crisp on the bottom and chewy in the center, this gluten-free pie gives pizzeria fare a run for its money. Feel free to vary the toppings to suit...
more ›
subscribe to Bon Appétit
For tomato sauceingredients
- 1 (15-ounce) can crushed tomatoes with added purée
- 4 1/2 teaspoons extra-virgin olive oil
- 1/2 teaspoon sugar
- 1/2 teaspoon fine sea salt
- 1/4 teaspoon dried oregano
For pizza crust
- 3/4 cup tapioca flour
- 1/2 cup white rice flour*
- 1/3 cup chickpea flour
- 1/3 cup sorghum flour
- 1 teaspoon xanthum gum
- 1 teaspoon fine sea salt
- 1/2 cup whole milk
- 2 1/4 teaspoons active dry yeast, from 1 (1/4-ounce) package
- 2 teaspoons sugar
- 2 large egg whites, lightly beaten
- 3 tablespoons plus 1 teaspoon extra-virgin olive oil
For topping
- 4 teaspoons extra-virgin olive oil
- 8 ounces fresh mozzarella, coarsely grated (about 1 1/2 cups)
- 1/4 ounce Parmigiano-Reggiano, finely grated (about 1 tablespoon)
- 4 large fresh basil leaves, roughly torn
- *Be sure to use white rice flour; brown will result in gritty pizza dough.
Special equipment:
- Special equipment: pizza stone or heavy baking sheet, baking peel or heavy baking sheet, parchment paper
preparation
Make tomato sauce
In a 4-quart nonreactive saucepan over very low heat, stir together tomatoes and oil. Bring to simmer, cover partially, and continue simmering, stirring occasionally, until sauce is reduced to 1 cup, 20 to 25 minutes. Stir in sugar, salt, and oregano, cover. Keep warm or refrigerate, covered, up to 5 days.
In a 4-quart nonreactive saucepan over very low heat, stir together tomatoes and oil. Bring to simmer, cover partially, and continue simmering, stirring occasionally, until sauce is reduced to 1 cup, 20 to 25 minutes. Stir in sugar, salt, and oregano, cover. Keep warm or refrigerate, covered, up to 5 days.
Make pizza crust
In bowl of electric mixer, whisk together tapioca flour, white rice flour, chickpea flour, sorghum flour, xanthum gum, and salt.
In bowl of electric mixer, whisk together tapioca flour, white rice flour, chickpea flour, sorghum flour, xanthum gum, and salt.
In small saucepan over moderate heat, stir together milk and 1/4 cup water and heat until warm but not hot to the touch, about 1 minute (the mixture should register between 105°F and 115° F on candy thermometer). Stir in yeast and sugar. Add milk–yeast mixture, egg whites, and 2 tablespoons oil to dry ingredients and, using paddle attachment, beat at medium speed, scraping bowl occasionally, until dough is very smooth and very thick, about 5 minutes.
Remove racks from oven, set pizza stone or heavy upturned baking sheet on bottom of oven, and preheat to 400°F. (Preheat at least 45 minutes if using pizza stone or 20 minutes if using baking sheet.)
Have ready two 12-inch squares parchment paper. Scrape half of dough onto each square and form each half into a ball. Coat each ball with 2 teaspoons oil, then use oiled fingertips to pat and stretch each ball into 9-inch-diameter round, 1/4 inch thick, with a 1/2-inch-thick border. Loosely cover rounds with plastic wrap and let rise in warm draft-free place until each pizza is about 10 inches in diameter, about 20 minutes.
Using baking peel, transfer 1 crust with parchment to preheated pizza stone and bake until top is puffed and firm and underside is crisp, 5 to 10 minutes. Using baking peel and discarding parchment paper, transfer baked crust to rack to cool. Bake second crust in same manner. (Baked crusts can be made ahead and frozen, wrapped in plastic wrap, up to 1 month. Thaw in 350°F oven until hot, 4 to 5 minutes, before topping and broiling.)
Top and broil pizzas
Preheat broiler. Transfer baked crusts to 2 large baking sheets. Brush 1 teaspoon olive oil over each crust. Spread each with sauce, leaving 1/2-inch border bare, then sprinkle each with mozzarella and Parmigiano-Reggiano. Drizzle remaining 2 teaspoons olive oil over pizzas.
Preheat broiler. Transfer baked crusts to 2 large baking sheets. Brush 1 teaspoon olive oil over each crust. Spread each with sauce, leaving 1/2-inch border bare, then sprinkle each with mozzarella and Parmigiano-Reggiano. Drizzle remaining 2 teaspoons olive oil over pizzas.
Broil pizzas about 4 inches from heat, rotating as needed for even browning, until cheese is bubbling and browned in places and crust is golden brown, 4 to 8 minutes. Scatter with basil, slice, and serve immediately.
Read More http://www.epicurious.com/recipes/food/views/Gluten-Free-Pizza-241924#ixzz2IfWa1WrG
Sunday, January 6, 2013
Free Blogger Event

PRESENTS

Prize:
ARV $229.99
This Blogger Giveaway Event is FREE for the first link with announcement post.
Additional links are $2
Link Options (FB cannot be a paid 2nd link):
Twitter, Pinterest, RSS, Facebook (link not like button)
~~~~~
Daily Picket Fence Votes or Daily Klout are $3
~~~~~
If you choose to not post the announcement the cost is $5
~~~~~
HOST Pages are available for $10
When: 1/14-1/28
Who: Open to US residents in the continental 48 states
**Bloggers worldwide can join in the participation as long as you have at least 50% US readership
Sign-ups close 1/12
**The blogger with the most referrals will receive the additional links at no cost
Click HERE to sign up and for more html info.
M.O.O.N. has now added several perks/discounts for frequent participation in our events but you must be a member of our Facebook group to be eligible. Please visit the M.O.O.N. group if you are a blogger and would like more information regarding these perks and other group events.
M.O.O.N. has now added several perks/discounts for frequent participation in our events but you must be a member of our Facebook group to be eligible. Please visit the M.O.O.N. group if you are a blogger and would like more information regarding these perks and other group events.
Gluten Free Dairy Free Sweet Potato Chicken Casserole
Gluten Free Dairy Free Sweet Potato Chicken Casserole


The snow is (finally) flying in my neck of the woods… I am in the need for some warming food. Gluten Free Dairy Free Sweet Potato Chicken Casserole is a perfect comfort food with sweet potatoes, chicken and a smooth creamy sauce to tie it all together. This is a hit with grownups and kids alike. Have any leftovers? It travels well in a thermos for lunch for a mid-day pick-me-up.
Note: For a bit more color, you can sprinkle minced fresh parsley over the top when serving. This is also delicious with roasted garlic stirred into the sauce. Mmmm….
Gluten Free Dairy Free Sweet Potato Chicken Casserole
Author/Source:
adapted by Angela @ Onceamonthmom.com from Rachel @ allrecipes.com
Ingredients:
- 1 tablespoon olive oil
- 1 1/4 cups onions, peeled and diced
- 1 teaspoon garlic (I have also used up to a tablespoon of roasted garlic in this, because that is how I roll)
- 4 cups sweet potatoes, peeled and diced
- 2 medium carrots, diced
- 24 ounces boneless skinless chicken breasts, chopped
- 1 tablespoon corn starch, arrowroot powder, or sweet rice flour
- 1 cup dry white wine or more gluten free chicken stock
- 1 cup gluten free chicken stock
- 1/4 cup canned coconut milk
Directions:
Heat the oil in a large skillet over medium heat. Cook onion and garlic until golden. Add sweet potatoes and carrot. Cook, stirring, for a few minutes until lightly browned.
Move vegetables to the edges of the pan. Put chicken into the center of skillet. Cook chicken until seared on all sides. Sprinkle chicken with corn starch, then stir in. Gradually whisk in chicken stock a bit at a time until all is added. Scrape any bits from the bottom of pan while whisking. Add wine and coconut milk and mix well.
Put mixture into an oiled baking dish. Bake in 400 degree oven for 1 hour until heated through and bubbly.
Freezing Directions:
Before baking, allow to cool. Put into a gallon sized freezer bag, remove as much air as possible, seal, label and freeze.
To serve: Thaw. Put contents of bag into baking dish. Bake in 400 degree oven for 1 hour until heated through and bubbly.
Servings: 4
Subscribe to:
Posts (Atom)
